
Turn a purchased item into a Fixed Asset — in one step.
Buy hardware, equipment or machinery through your normal purchase process in Business Central, then capitalize it as a Fixed Asset without a single manual journal. The app carries the cost, serial number and asset details straight onto a new Fixed Asset card — ready to depreciate.
Business Central
Figure Index
What Item to Fixed Asset does
Some things you buy as inventory don't stay inventory. A laptop, a machine, or a piece of equipment purchased through procurement is often put into long-term company use — which means it belongs on the balance sheet as a capitalized asset, not in stock.
Item to Fixed Asset is a Microsoft Dynamics 365 Business Central extension from Trident Information Systems that bridges that gap. You purchase the item the way you always do — a purchase order, transfer order, RGP, serial-number tracking, goods receipt and posting — and then convert it into a Fixed Asset from a single page. The app creates the Fixed Asset card for you and carries across the description, serial number, asset class, location and acquisition cost, so the asset is ready to depreciate straight away.
It solves two everyday problems for finance and operations teams:
- Capitalization of the asset. An item bought as stock is recorded as a company Fixed Asset once it's put into use — no re-keying and no manual acquisition journals.
- Depreciation tracking. After conversion the asset is attached to a depreciation book, so you can run depreciation (straight-line, declining balance, and the other methods your book supports), track book value, and see remaining useful life.
- Sales of the assets. A Fixed Asset that has reached the end of its useful life or is otherwise disposed of is sold directly from its asset record — no re-keying and no manual disposal journals. The sale posts the disposal, reverses the accumulated depreciation, and recognises the gain or loss automatically, keeping the asset ledger and the general ledger perfectly in sync.
Because everything flows through standard Business Central documents, your inventory ledger, Fixed Asset ledger and general ledger stay reconciled at every step — and the app adds guardrails (for example, cost changes are locked once an item becomes an asset) so the numbers stay clean.
What you get
One-step conversion
Convert a received item into a Fixed Asset from the FA Purchase Pending page — no manual FA acquisition journal required.
Serial-number traceability
The item's serial number follows it from purchase, onto the Fixed Asset card, and through every later movement.
Fixed Asset card, filled in
Class, sub-class, location, posting group and acquisition cost are populated automatically from the purchased item.
Depreciation-ready
The new asset is linked to a depreciation book, so you can post depreciation and track book value immediately.
Cost controls
Item charges can be applied only before conversion. Once the item is an asset, its cost is locked to keep valuation accurate.
Asset movement (RGP)
Send an asset out for repair or maintenance and receive it back using a Returnable Gate Pass shipment and receipt.
Asset relocation
Move an asset between offices, branches, plants or sites with a Transfer Order — with no gain or loss and no change to asset value.
Full GL visibility
Every step posts a traceable financial entry and voucher, and FA Item Ledger Entries are visible from the item card.
How it works, end to end
The app follows the life of the asset — from a flagged item, through purchase and conversion, to movement and relocation. The first three stages capitalize the asset (shown in blue); the last two keep it maintained in the field (shown in amber).
Prerequisites
To use Item to Fixed Asset, make sure the following are in place in your Business Central environment:
- A supported version of Microsoft Dynamics 365 Business Central (cloud or on‑premises). PLACEHOLDER — state the exact minimum supported version, e.g. "Business Central 2024 release wave 1 (v24) or later".
- Fixed Assets configured: FA classes, sub-classes, FA locations, FA posting groups and at least one depreciation book.
- Item tracking: a serial-number item tracking code for the items you plan to convert, so each asset can be traced individually.
Install from Microsoft AppSource
Open the listing. Go to the Item to Fixed Asset page on Microsoft AppSource, or in Business Central open
Extension Marketplaceand search for Item to Fixed Asset by Trident Information Systems.Get it now. Select Get it now, choose the environment and language you want to install into, and confirm.
Wait for installation. Business Central installs the extension. You can check progress under
Extension Management.Assign permissions. Give the relevant users the app's permission set so they can access the new pages and actions.
Set up an item as an asset
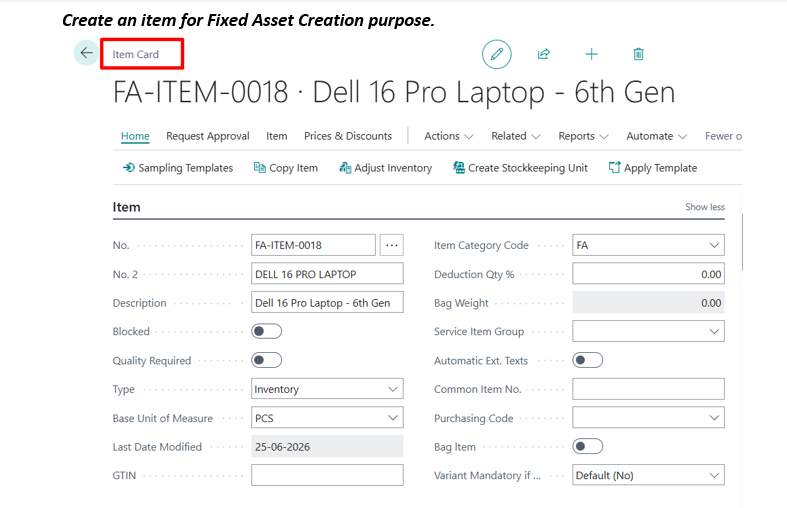
An item becomes eligible for conversion when you flag it on the item card and complete its asset details. You only do this for items that will be capitalized.
Open (or create) the item. On the Item Card, use an item that represents the asset you're buying — for example, a laptop model.
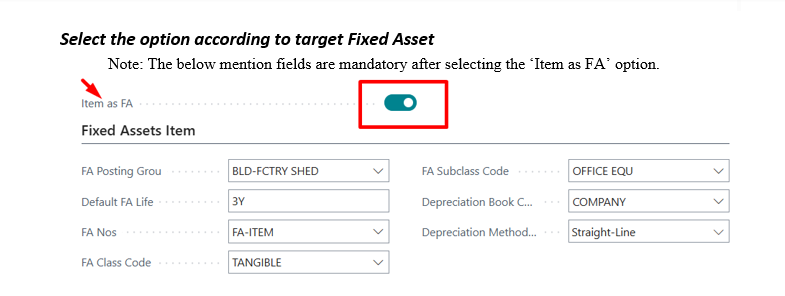
Turn on Item as FA. Enable the Item as FA option. This reveals the asset fields that link the item to a future Fixed Asset.
Complete the mandatory asset fields. After you turn on Item as FA, the FA-related fields become required — the target FA class, FA sub-class, FA location and the matching depreciation setup.
Add the FA posting group. Assign the posting group that matches the target Fixed Asset so the acquisition posts to the correct accounts.
Using the app
The four guides below cover the full working life of an asset: buying and converting it, then moving it out and back, and relocating it between sites.
Guide 1 · Create a Fixed Asset from an item
Purchase the flagged item through your normal process, then post it so it's ready to convert.
Confirm the item is set up. Make sure Item as FA is on and the asset fields and posting group are complete (see Set up an item as an asset).
Create a purchase order. Raise a Purchase Order for the item and the quantity you're buying.
Assign the serial number on the line. Open item tracking on the purchase line and assign the serial number(s). You can adjust the serial number to suit your requirement, then Release the purchase order.
Add a gate entry. Create a Gate Entry against the same purchase order, then add the gate-entry line for that order to record the physical inward receipt.
Post the purchase order. Post the receipt and invoice as usual.
Check the financials. Review the resulting financial entry, the general-ledger impact, and the posted voucher. The acquisition value is recorded against the asset/interim account, ready for conversion.


Guide 2 · Convert the item into a Fixed Asset
Once the purchase is posted, the item appears as pending conversion.
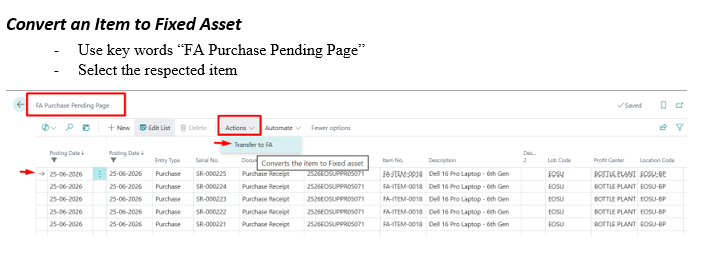
Open FA Purchase Pending. Search for
FA Purchase Pendingand open the page.Select the item. Pick the line for the item you want to capitalize.
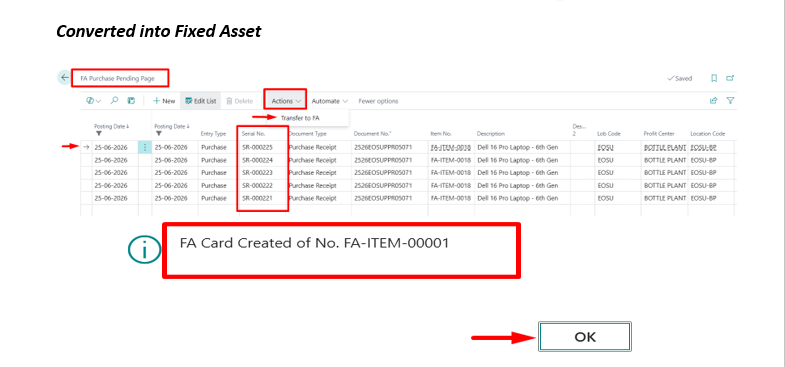
Convert. Run the conversion. The app creates the Fixed Asset and its card.
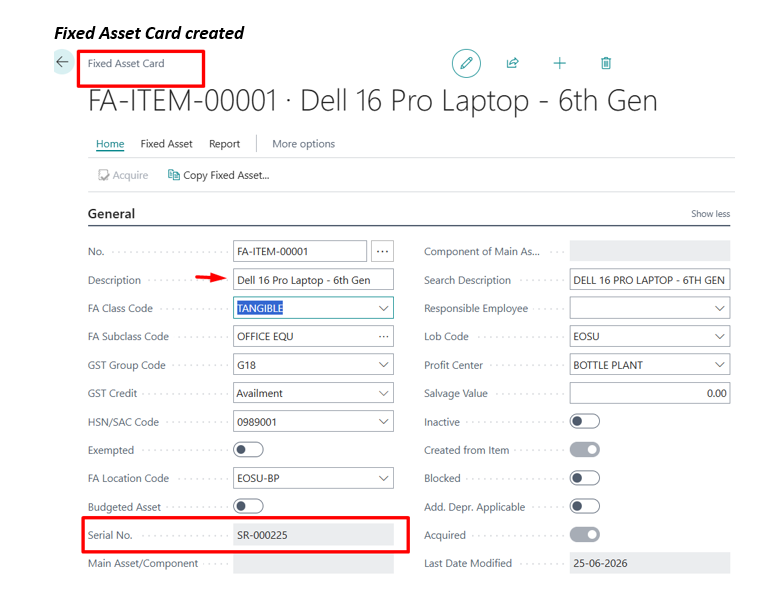
Review the Fixed Asset card. Open the new asset. Its description, serial number, class, sub-class, location and acquisition cost are already filled in from the purchased item.
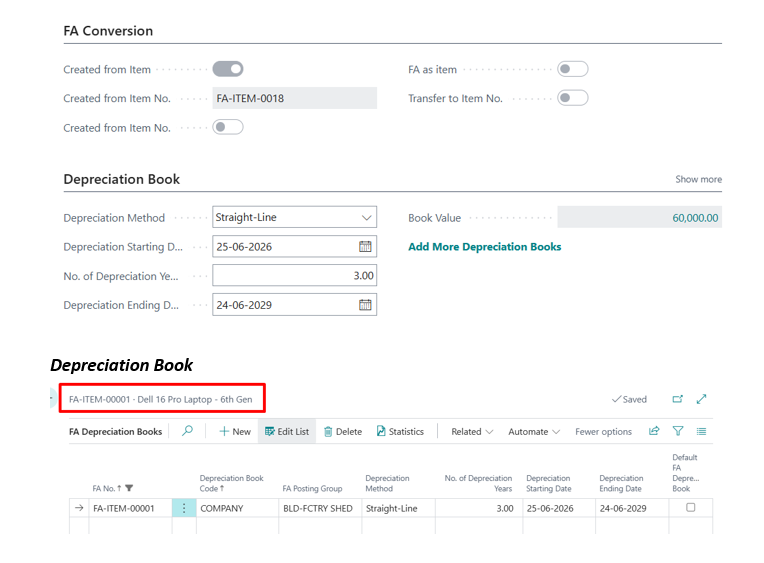
Confirm the depreciation book. Check that the depreciation book is attached so depreciation can be posted.
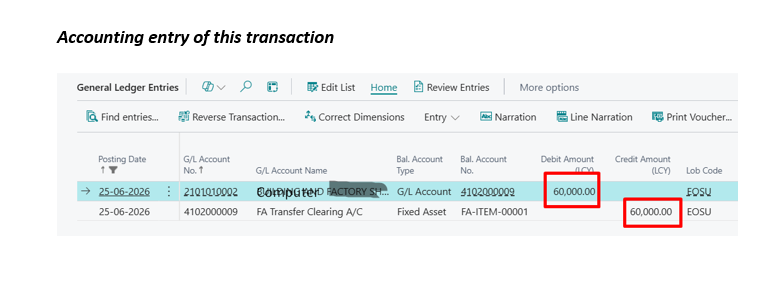
Review the accounting entry. Look over the entry generated by the conversion.
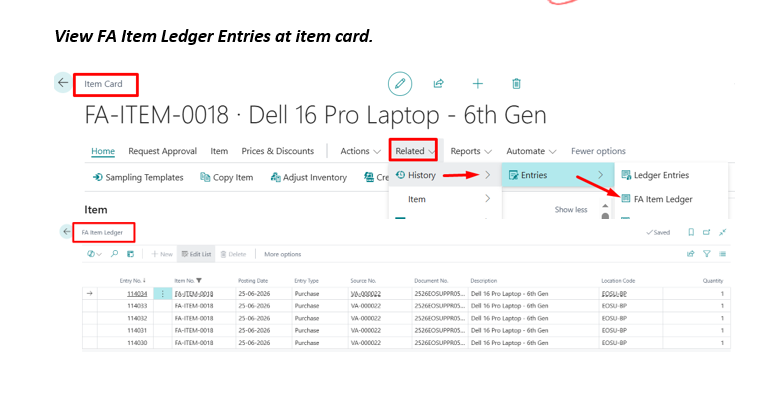
Trace it from the item card. On the item card, open FA Item Ledger Entries to see the complete trail from item to asset.
Guide 3 · Move an asset out and back (Returnable Gate Pass)
Use a Returnable Gate Pass (RGP) when an asset physically leaves your premises and is expected to return — for example, when it goes out for repair or maintenance.
Ship the asset out
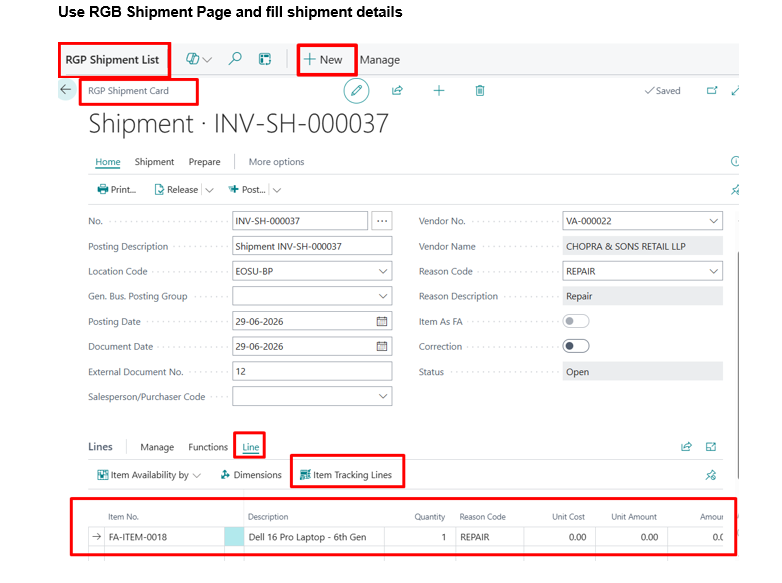
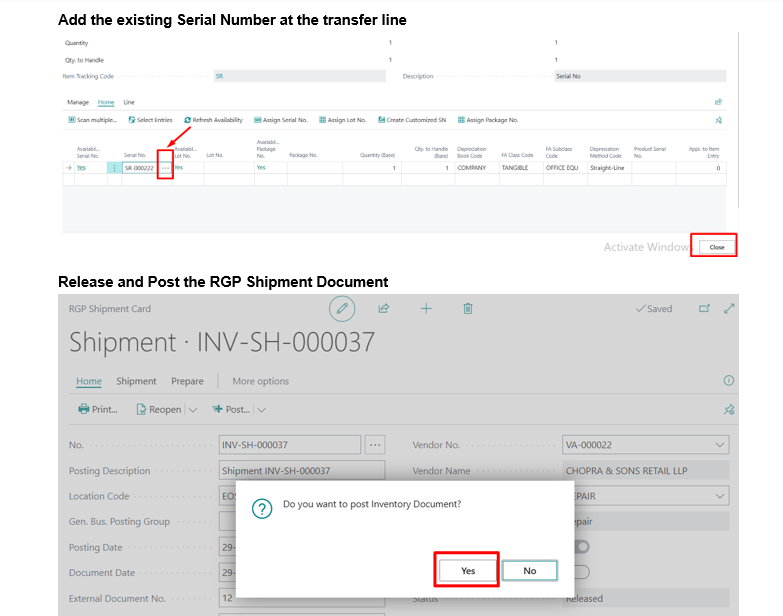
Open the RGP Shipment page and fill in the shipment details.
Add the asset on the line. Enter the asset's existing serial number on the transfer line.
Release and post the RGP shipment document.
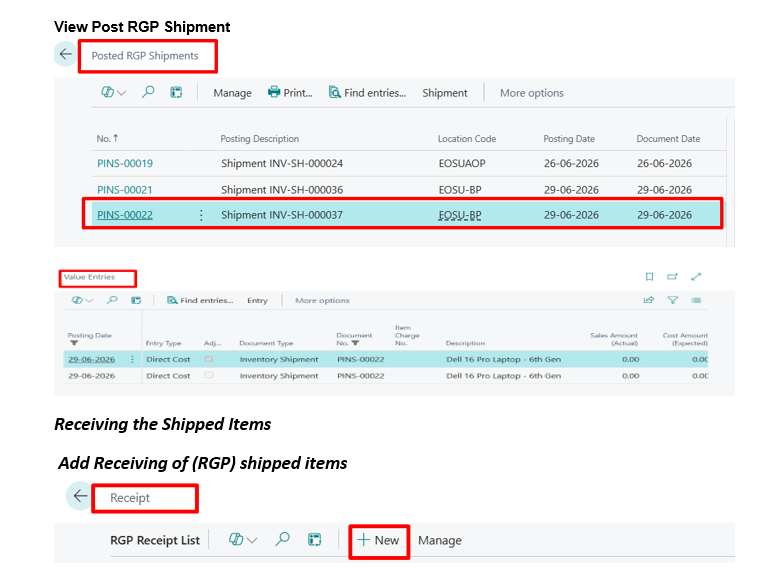
Review the posted shipment. Open the posted RGP shipment to confirm it.
Receive the asset back
Start an RGP receipt. Open the FA receiving page and add a receipt for the returned items.
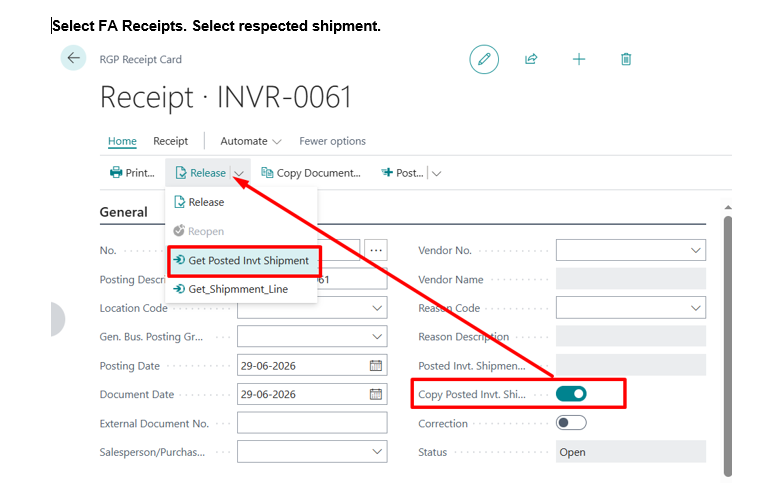
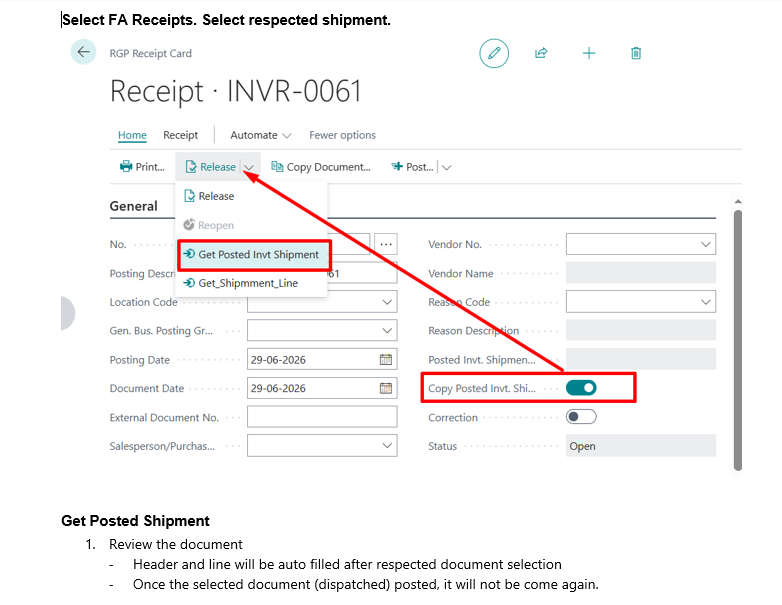
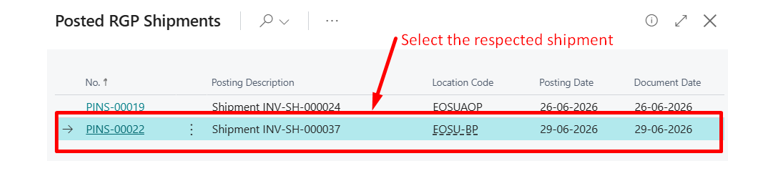
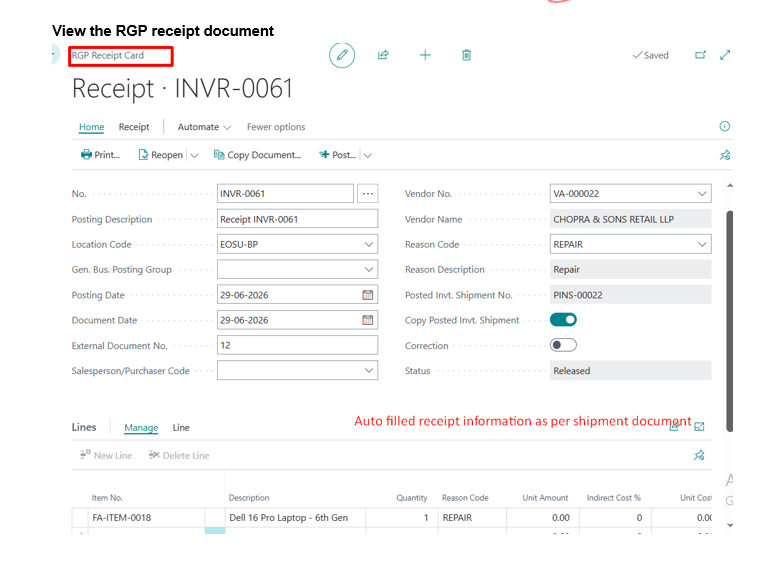
Get the posted shipment. Choose FA Receipts → Get Posted Shipment and select the related shipment. The header and lines fill in automatically from the selected document.
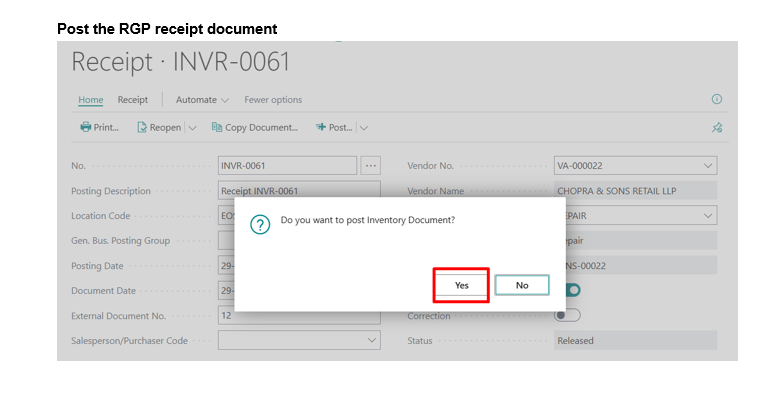
Post the receipt. Review the document, then post the RGP receipt.
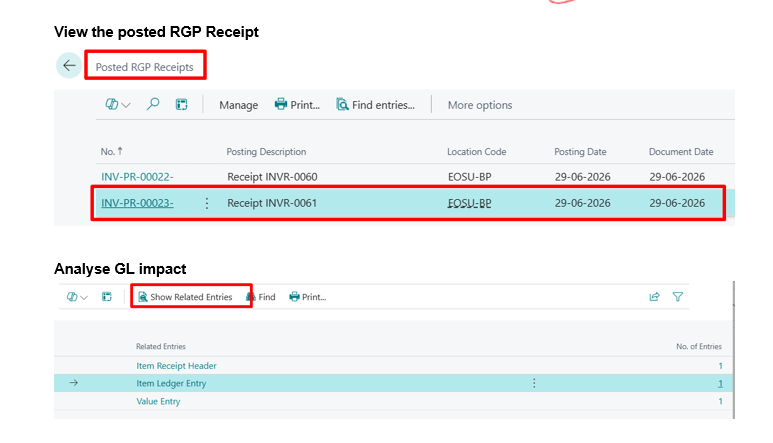
Check the result. View the posted RGP receipt and review the general-ledger impact.
Guide 4 · Relocate an asset (Transfer Order)
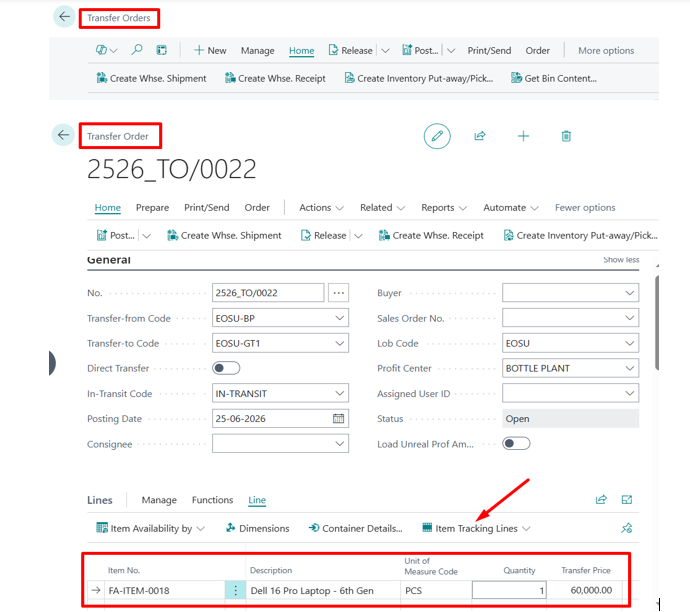
Use a Transfer Order to change an asset's location — moving it between offices, branches, plants, warehouses or sites for better use or for repair and maintenance. The asset value stays the same and no gain or loss is calculated.
Create a transfer order. Set the from, to and in-transit locations, and add the asset line.
Select the serial number. Choose the serial number of the asset being moved.
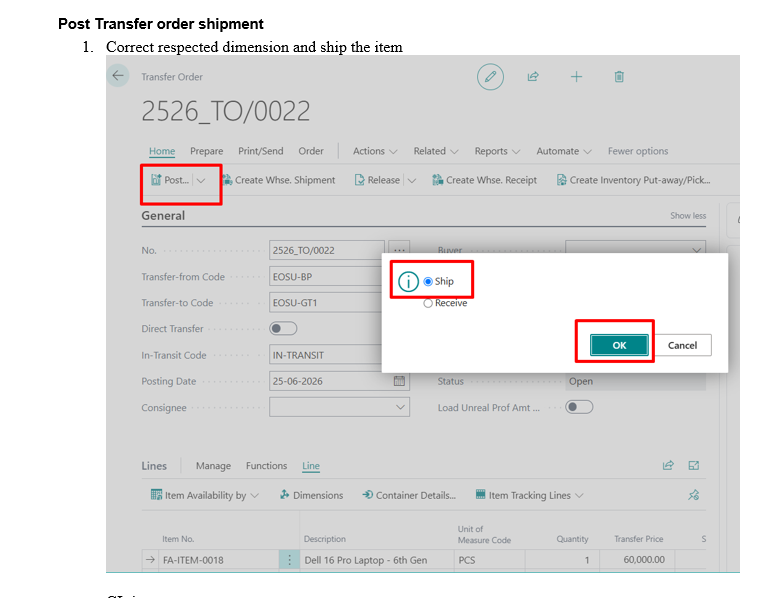
Ship it. Set the correct dimensions, then post the transfer shipment. Review the general-ledger impact.
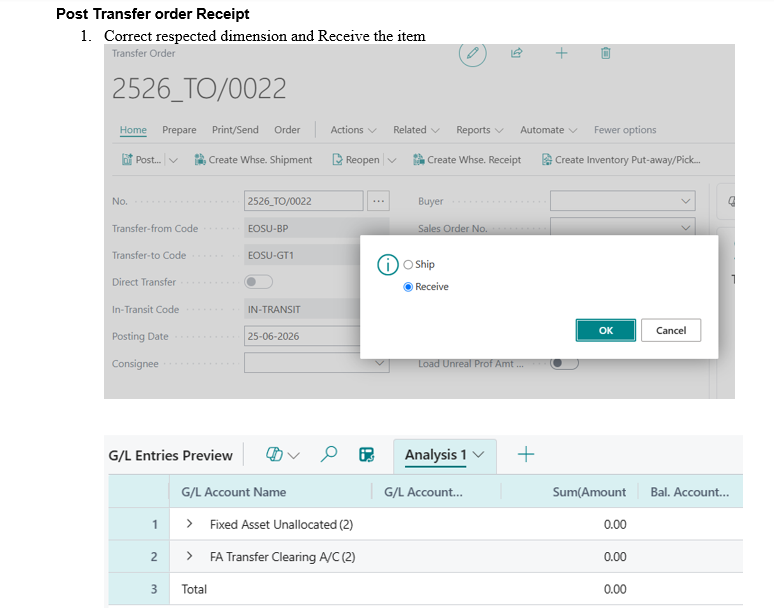
Receive it. Set the correct dimensions, then post the transfer receipt.
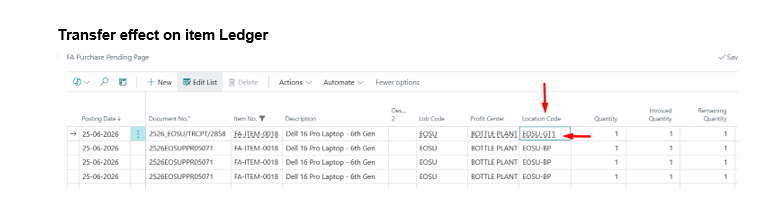
Verify. Check the transfer's effect on the item ledger to confirm the asset now sits at its new location.
Business rules & validations
- Item charges are pre-conversion only. You can assign item charges to the item while it's still inventory. After conversion, the app blocks new item charges and cost changes, so the capitalized value stays fixed.
- Serial numbers carry through. Each asset is tracked by serial number from purchase to conversion to every later movement, keeping a single, traceable identity.
- Transfers don't change value. A Transfer Order relocates an asset with no gain or loss and no change to its book value.
- Movements are received once. A posted RGP dispatch can't be selected again for receipt, preventing duplicate returns.
- Everything is auditable. Each step posts a financial entry and voucher, and FA Item Ledger Entries are available from the item card.
Frequently asked questions
Do I need to post a manual Fixed Asset acquisition journal?
No. The conversion posts the acquisition for you and creates the Fixed Asset card, so there's no separate FA acquisition journal to enter by hand.
What depreciation methods are supported?
Whatever your Business Central depreciation book supports — straight-line, declining balance, and the other standard methods. The app links the new asset to the depreciation book so you can post depreciation right after conversion.
Can I add freight or customs to the asset's cost?
Yes — as item charges, but only before you convert the item. Once it becomes a Fixed Asset, the cost is locked. Apply any landed costs while the record is still an item.
Why does the item need a serial number?
The serial number gives each asset a single identity that carries through purchase, conversion, and every movement — so the item ledger, Fixed Asset ledger and physical asset all line up. Set up serial-number item tracking on the item before you buy it.
What's the difference between a Returnable Gate Pass and a Transfer Order?
A Returnable Gate Pass (RGP) is for sending an asset out and receiving it back — for example, for repair. A Transfer Order permanently relocates an asset from one location to another. Neither changes the asset's value.
Does it work on both Business Central cloud and on-premises?
The app targets Microsoft Dynamics 365 Business Central and is available on AppSource. PLACEHOLDER — confirm the exact supported deployment and version range for your listing.
Where can I see the financial trail for an asset?
Every step posts a financial entry and voucher. From the item card you can open FA Item Ledger Entries to follow the full history from item to asset.
Need a hand?
Trident's Business Central team can help with setup, configuration and rollout — and we'd love your feedback to keep improving the app.
- Product
- Item to Fixed Asset for Business Central
- Publisher
- Trident Information Systems (P) Ltd.
- Support
- support@tridentinfo.com
- Feedback
- Suggestions and comments are welcome via the contact options above.